A Home Assistant dashboard for the ComfoAir E400
/ 10 min read
Table of Contents
I have a Zehnder ComfoAir E400 heat-recovery ventilation unit (MVHR) wired into Home Assistant via the excellent yoziru ESPHome project. Getting it into Home Assistant in the first place — reading the unit over RS485 and controlling the fan with a Shelly — was its own afternoon of work; this post is the layer on top. It throws off ~76 entities — temperatures, humidities, flow rates, fan duty cycles, bypass states — but they were scattered across the entity list with no story. I wanted one card I could glance at, tap, and actually understand.
This is the write-up of building that card. The interesting parts aren’t the YAML — they’re the three places where the obvious approach doesn’t work: a stock example card written for a different model, a “days until filter change” sensor that never reports a number, and a bypass you can watch but can’t touch.
The whole thing was built by talking to Claude Code, which edits my dashboards directly through the HA MCP server I set up last time. No hand-editing ui-lovelace.yaml, no copy-paste — just “make the bypass status more prominent with the reason” and watching it land.
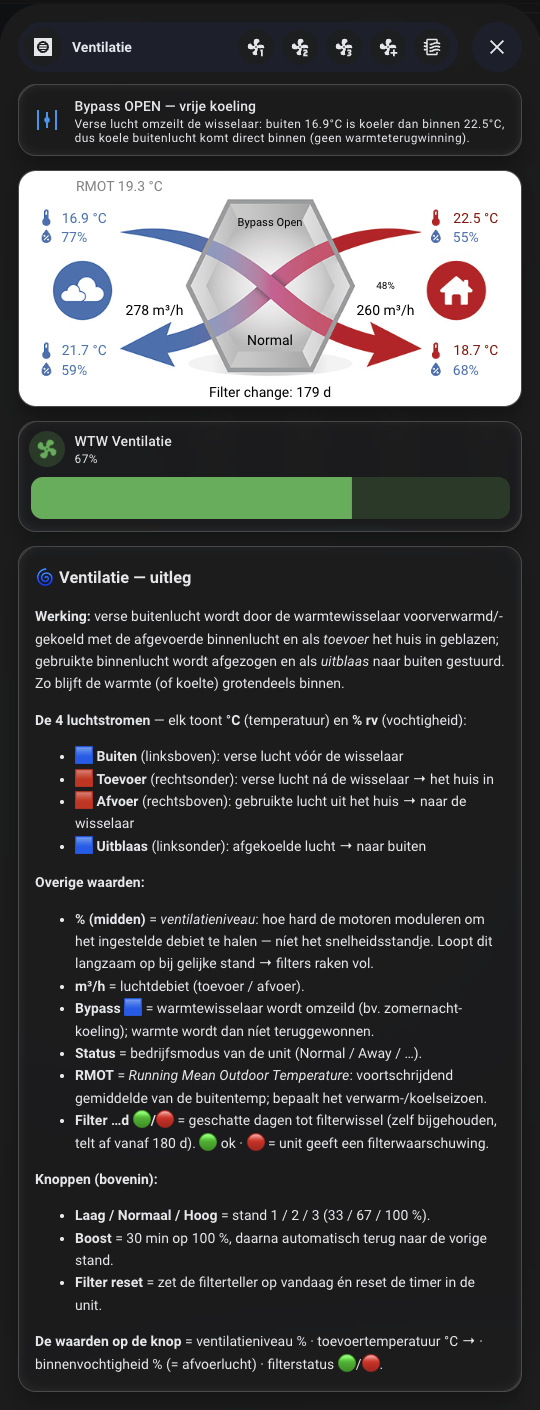
The airflow diagram: a picture-elements card
The yoziru repo ships an example picture-elements card: a schematic of the unit with sensor values floated on top at percentage coordinates. It’s exactly the mental model I wanted — you see the four air streams instead of reading a list.
The catch: the example is written for the ComfoAir Q350, whose entities are named sensor.zehnder_comfoair_q350_*. My E400 (via ESPHome) names them sensor.comfoair_*. So every entity had to be remapped, and a handful of Q350-only sensors — bypass-change timers, temperature profiles, heating/cooling-season binary sensors — simply don’t exist on my unit and got dropped.
A picture-elements card is just a background image plus elements positioned with top/left percentages:
type: picture-elementsimage: /local/images/ventilation.pngstyle: | ha-card { height: 220px !important; }elements: - type: state-label entity: sensor.comfoair_extract_temperature # air leaving the house style: {top: 20%, left: 91%, color: darkred} - type: state-label entity: sensor.comfoair_supply_temperature # fresh air into the house style: {top: 76.2%, left: 91%, color: darkred} - type: state-label entity: sensor.comfoair_outdoor_temperature # incoming from outside style: {top: 20%, left: 13%, color: "#4171b1"} - type: state-label entity: sensor.comfoair_exhaust_temperature # blown back outside style: {top: 76.2%, left: 13%, color: "#4171b1"} # ...humidities, flow rates, status, RMOT, bypassThe four corners map to the four air streams an MVHR juggles: outdoor (fresh, pre-exchanger) → supply (fresh, post-exchanger, into the house), and extract (stale, from the house) → exhaust (cooled, back outside). The heat exchanger sits in the middle trading warmth between the two.
Gotcha: those
top/leftvalues were tuned for the Q350’s schematic image. If yourventilation.pngdiffers even slightly, labels land in the wrong spot and you nudge percentages 2–3% at a time. Coordinates are relative to the card box, so changing the card height just scales everything uniformly.
One card, two behaviours: the Bubble Card popup
I already drive my floor/room cards with Bubble Card: a compact Mushroom template card shows a one-line summary, and tapping it navigates to a #hash that a Bubble Card pop-up listens on. I wanted ventilation to behave identically — a small tile on the home view, a rich popup on tap.
The trigger is a mushroom-template-card with an emoji status line and a navigation action:
type: custom:mushroom-template-cardicon: mdi:hvacicon_color: "{{ 'blue' if is_state('binary_sensor.comfoair_bypass','on') else 'teal' }}"primary: Ventilatiesecondary: >- {% set level = states('sensor.comfoair_ventilation_level')|float(0) %} {% set temp = states('sensor.comfoair_supply_temperature')|float(0) %} {% set hum = states('sensor.comfoair_extract_humidity')|float(0) %} {% set f = ' 🔴' if is_state('binary_sensor.comfoair_filter_warning','on') else ' 🟢' %} {{ '%.2f'|format(level) }}% | {{ '%.1f'|format(temp) }}°C → | {{ '%.2f'|format(hum) }}% 🏠 | Filter{{ f }}tap_action: action: navigate navigation_path: "#ventilatie"That renders as a compact tile on the home view, sitting alongside my room cards:

The popup is a single bubble-card whose content lives in its own nested cards: array — the diagram, the fan control, a bypass status card, and an explainer all stack inside it:
type: custom:bubble-cardcard_type: pop-uphash: "#ventilatie"name: Ventilatieicon: mdi:hvaccards: - type: vertical-stack cards: - <bypass status card> - <picture-elements diagram> - <mushroom-fan-card> - <markdown explainer>One detail worth stealing: format your numbers in the template. The raw humidity sensor reports 54.2999992370605, which is unreadable. {{ '%.2f'|format(hum) }} caps it; temperatures read fine at one decimal. Small thing, big difference on a phone.
The fan has three speeds — and a boost that reverts itself
fan.wtw_ventilatie has no preset modes; it’s a percentage fan with a step of ~33.33%. That maps cleanly to the ComfoAir’s discrete levels:
| Percentage | Level | Label |
|---|---|---|
| 0% | 0 | Away / Afwezig |
| 33% | 1 | Low / Laag |
| 67% | 2 | Medium / Normaal |
| 100% | 3 | High / Hoog |
So the popup gets four sub-buttons — Laag/Normaal/Hoog set a level directly, and a Boost that runs to 100% for 30 minutes and then puts it back where it was. That last bit needs a script, because a dashboard button can’t time itself:
alias: ComfoAir Boost 30 minmode: singlesequence: - variables: prev_pct: "{{ state_attr('fan.wtw_ventilatie','percentage') | int(67) }}" - action: fan.set_percentage target: {entity_id: fan.wtw_ventilatie} data: {percentage: 100} - delay: "00:30:00" - action: fan.set_percentage target: {entity_id: fan.wtw_ventilatie} data: {percentage: "{{ prev_pct }}"}mode: single is the important choice. It captures the previous speed once at the start; pressing Boost again while it’s running is ignored, so a second press can’t “remember” 100% as the level to revert to. The trade-off is that a re-press doesn’t extend the timer, and an HA restart mid-boost loses the pending revert — for survive-restart behaviour you’d swap the in-script delay for a timer helper plus an automation.
The filter countdown the unit refuses to give you
I wanted “X days until filter change” on the card. There’s a sensor.comfoair_filter_remaining with a d (days) unit, so this looked trivial. It wasn’t — it read unknown. A week of history told the real story:
sensor.comfoair_filter_remaining unknown → unavailable → unknown → unavailable → unknown …It has never reported a number. The flips between unknown and unavailable just track the ESPHome device reconnecting. This is a firmware/protocol limitation of the E400 — the value isn’t in the data the unit sends. The filter entities that do work are the binary warning, the binary status, and a number for the replacement interval (180 days).
So a real countdown has to be tracked in Home Assistant, not read from the unit. Three pieces:
-
An
input_datetime.comfoair_filter_last_changed(date only) — when I last changed the filters. -
A template sensor that counts down from the configured interval:
{% set i = states('number.comfoair_filter_replacement_interval')|float(180) %}{% set ts = state_attr('input_datetime.comfoair_filter_last_changed','timestamp') %}{% if ts is not none %}{{ (i - (as_timestamp(now()) - ts) / 86400) | round(0) }}{% else %}unknown{% endif %} -
A reset script that stamps the date to today and presses the unit’s own
button.comfoair_reset_filter_timer, surfaced as a confirm-protected button in the popup.
The interval is read live from the number entity, so if I change it on the unit the countdown follows. It’s a small amount of plumbing to replace one sensor the hardware should have provided — but now the card shows Filter 179d 🟢 and means it.
The bypass: a switch you can see but not flip
“Should there be a button to open/close the bypass?” My first instinct was yes. Then I checked the entities:
binary_sensor.comfoair_bypass (on/off — read-only)binary_sensor.comfoair_bypass_motor_extract_airbinary_sensor.comfoair_bypass_motor_outdoor_airAll three are binary_sensor. There is no switch, select, or number for the bypass anywhere in my ComfoAir entities. On the E400 the bypass is fully automatic — the unit decides, and nothing in HA can command it. A button would have had nothing to call.
That’s actually fine, because the logic is simple and the unit is good at it:
- Closed (normal): air goes through the heat exchanger and recovers warmth. What you want in heating season.
- Open: fresh outdoor air skips the exchanger and comes in at its real temperature. The unit does this for free summer cooling — when it’s warmer inside than your comfort setpoint and cooler outside.
Mine was open the whole time I built this: it’s June, indoor (extract) air ~22.6 °C, outdoor ~17 °C. Cooler outside than in, so the unit opened the bypass to free-cool the house. Working exactly as designed.
Since I can’t control it, I made it explain itself — a Mushroom template card at the top of the popup that switches icon, colour, and text on the bypass state, and reads out the live temperatures driving the decision:
type: custom:mushroom-template-cardentity: binary_sensor.comfoair_bypassicon: "{% if is_state('binary_sensor.comfoair_bypass','on') %}mdi:valve-open{% else %}mdi:valve-closed{% endif %}"icon_color: "{% if is_state('binary_sensor.comfoair_bypass','on') %}blue{% else %}green{% endif %}"primary: >- {% if is_state('binary_sensor.comfoair_bypass','on') %}Bypass OPEN — vrije koeling {% else %}Bypass DICHT — warmteterugwinning{% endif %}secondary: >- {% set out = states('sensor.comfoair_outdoor_temperature')|float(0) %} {% set ind = states('sensor.comfoair_extract_temperature')|float(0) %} {% if is_state('binary_sensor.comfoair_bypass','on') %} Verse lucht omzeilt de wisselaar: buiten {{ '%.1f'|format(out) }}°C is koeler dan binnen {{ '%.1f'|format(ind) }}°C, dus koele buitenlucht komt direct binnen. {% else %} Lucht gaat dóór de wisselaar; warmte uit de afvoerlucht wordt teruggewonnen. {% endif %}multiline_secondary: truetap_action: {action: more-info}If you genuinely want manual control, it lives where the unit’s logic lives: the Zehnder ComfoConnect app (bypass mode Auto/Open/Closed and the comfort temperature), or — the deep end — adding a bypass override to the ESPHome firmware if the protocol accepts one. For me, Auto plus a self-explaining indicator is the right answer.
Don’t forget the legend
The last addition was the most boringly useful: a markdown card at the bottom of the popup explaining every value — the four air streams, what “ventilation level %” actually means (motor modulation to hit a target airflow, not the speed setting — and a slow climb at a fixed speed means the filters are clogging), RMOT, the bypass states, and what the four numbers on the trigger button map to. Six months from now I won’t remember why one humidity reading is tagged 🏠 (it’s the extract/indoor stream). The card will.
What I’d take away from this
- Borrowed example cards are a starting point, not a paste. Entity names differ across models; verify every one and drop what your hardware doesn’t expose.
- Trust history over the live state. “Why is this
unknown?” is answered by a week of history, not a single read. It turned a five-minute card tweak into “the firmware doesn’t provide this, build it yourself.” - Read-only is information, not a dead end. You can’t flip the bypass, but you can make it the clearest thing on the card.
- Build it conversationally. Every card, helper, and script here was created by describing what I wanted to Claude over the HA MCP server, iterating in plain language — “trim the line, it’s overflowing,” “make ‘binnen’ a house emoji” — and letting it apply the changes with optimistic-locked config edits. The dashboard YAML in this post is the output, not something I typed.
The unit was always ventilating my house just fine. Now I can finally see it think.